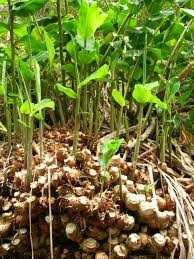
Growing the Ginger Planting Guide
The ginger root is very effective in fighting many body ailments. This root has been around for thousands of years, the ancients discovered its healing powers and took full advantage of it for centuries.
Ginger can be found in many products such as sodas, bread, cakes, candies, cooking recipes teas, medications, and so on.
But what process does it takes to produce such a potent plant that has proven to be so beneficial over the years and is still going strong?
For more on ginger facts and their benefits follow this link. Ginger root facts and benefits.
Planting and caring for the ginger plant
Here are some steps that have proven to be successful in growing the ginger plant. Ginger roots or rhizomes can be purchased from your nursery, garden center, supermarket or you may know of someone that is growing this plant which can give you a few roots.
The best time to grow ginger is the second week in April to the First week of May.
1. In my opinion, it is best to start gingers in a container. A 7 gallon or 15 gallons container will do.
2. Using compost or organic soil is ideal.
3. Fill the pot leaving about a foot to a foot and a half-space from the top. This amount of space will allow for proper watering of your plant.
4. Plant pot should have 4-6 holes at the bottom for proper drainage. Also, place your Gingers in an area that gets about 6 hours of sunlight.
5. When getting set to plant gingers divide the rhizomes into pieces with a sharp knife. Be very careful not to cut your hands. The part of the ginger that looks sort of round or pointed is where the new growth will start to divide into equal parts being very careful again not to cut into this area.
6. Allow gingers to soak in water for 2 hours.
7. Now you can move on to burying each piece with the pointed part in the upright position. Each piece can be planted about 6 inches apart.
8. Water the roots, giving them a good soaking.
9. In about 2 weeks to a month, you should see signs of new growth.
10. Keep the soil well-watered not waterlogged.
11. several more weeks and your ginger plant will be well on its way. It is also good at this point to fertilize your plant with a slow-release or organic fertilizer. Read and follow the label because the label is the law.
12. In about 5-6 months your Gingers will be ready to harvest.
Harvesting fresh ginger
1. When harvesting fresh ginger, with a garden trowel or hand spade, dig around the soil until the ginger root is exposed completely.
2. Remove the exposed ginger from the soil and with a hand pruner, remove leaves also.
3. Next, divide the gingers into pieces.
4. Wash thoroughly with water, preferably warm water.
5. You’re all set to enjoy your very own homegrown fresh ginger root
Final word
Following these simple steps will cause you to have good success when growing your ginger. So give it a try, nothing like delighting in fresh ginger that the ancients found to be so beneficial.
About the author
Norman loves being in the garden, both at home and for his job....
he is 'Natures Little helper' being outdoors, growing his vegetables and flowers from an early age.
Now having spent over 22 years in the profession he want to give some of his knowledge to others...
his vast array of hints and tips you will find scattered over this site will help you no end growing plants in your garden.


Never even knew how ginger looks like when growing, I know about the many benefits of consuming it and now I know how to grow it too! I like that you put a lot of step by step information easy to follow and to understand the process of how to grow ginger I may try it in my moms garden. thank you!
Hello Yulia so nice to meet you, gingers are pretty amazing and I just love them. I am so happy that I could help, all the best to you and please let me know how it goes. Have a good day.
Thanks so much for this information on growing ginger. I have purchased a variety of ginger from a lady. I had often wondered if I could grow this root. Now, I look very much forward to growing it. I would like to try a variety of types. Good info and thanks for the tips.
All the best to you,
Don